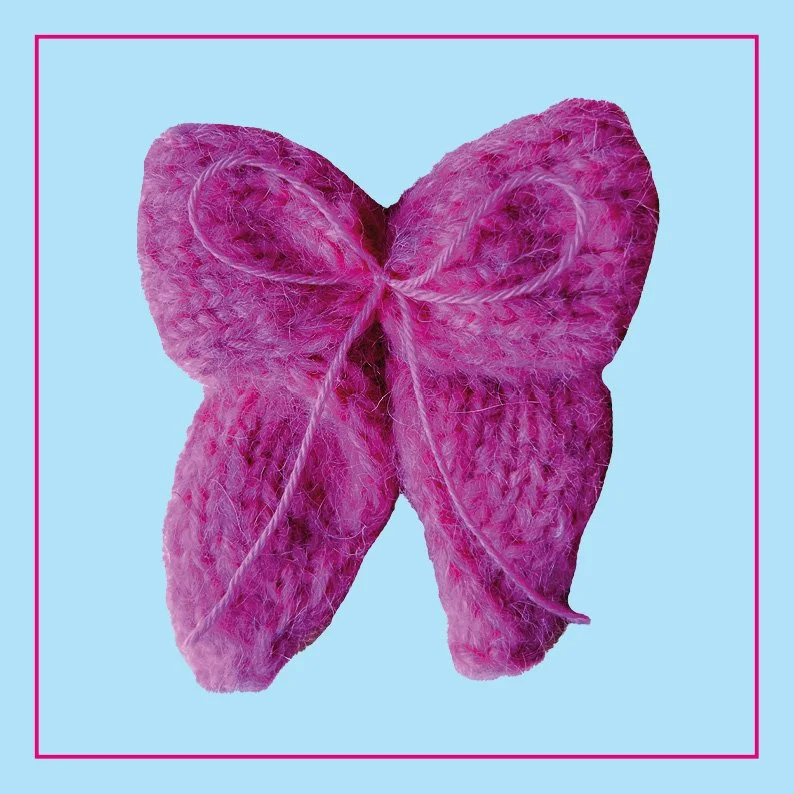
bow brooch
Pattern Details
Everything’s better with a bow on it, right? The Bow Brooch is a classic bow shape that you can attach to pins to pop it in your hair or onto your favorite jacket. Make one to re-pin to whatever your bag-of-the-day is, or make a small army of different colors to accessorize pieces across your closet.
Technique
The bow is knit end to end by starting with a few stitches, increasing width, and then decreasing width to create a point at the each end. Stitches are slipped on the end of each row to create an i-cord edge. Once the piece is knit, the bow is folded and secured with a piece of yarn.
Materials
Size 4 yarn
5mm knitting needles
Tapestry needle
The bow pictured was made using 1 strand Drops Melody held double with 1 strand Filcolana Arwetta and measures 3.75 in (9.5 cm) wide by 4.25 in (10.75 cm) tall. There is no essential gauge for the bow - make it with thin yarn for a subtle accessory or do it on huge needles for an oversized look!
Abbreviations
St(s) - stitch(es)
K - knit
P - purl
PW - purl-wise
M1R - make 1 right
SSK - slip, slip, knit
Fine print: Copyright 2025 Alexa Kari Designs. For personal use only. Reader/purchaser may not copy, resell, or redistribute and part of the pattern without permission. Reader/purchaser may not sell any garments created following the pattern.Video Tutorial
A complete Bow Brooch video tutorial is available on the Material Grrrlz YouTube channel:
Subscribe to get free patterns straight to your inbox:)
Instructions
Cast on 5 sts
Row 1: P2, slip the last 3 sts pw with yarn held at the front
Row 2: K2, M1R, slip the last 3 sts pw with yarn held at the back (6 sts)
Row 3: P3, slip the last 3 sts pw with yarn held at the front
Row 4: K2, M1R, K1, slip the last 3 sts pw with yarn held at the back (7 sts)
Row 5: P4, slip the last 3 sts pw with yarn held at the front
Row 6: K2, M1R, K2, slip the last 3 sts pw with yarn held at the back (8 sts)
Row 7: P5, slip the last 3 sts pw with yarn held at the front
Row 8: K2, M1R, K3, slip the last 3 sts pw with yarn held at the back (9 sts)
Row 9: P6, slip the last 3 sts pw with yarn held at the front
Row 10: K2, M1R, K4, slip the last 3 sts pw with yarn held at the back (10 sts)
Row 11: P7, slip the last 3 sts pw with yarn held at the front
Row 12: K2, M1R, K5, slip the last 3 sts pw with yarn held at the back (11 sts)
Row 13: P8, slip the last 3 sts pw with yarn held at the front
Row 14: K2, M1R, K6, slip the last 3 sts pw with yarn held at the back (12 sts)
Row 15: P9, slip the last 3 sts pw with yarn held at the front
Now continue in stockinette stitch:
Row A: K9, slip the last 3 sts pw with yarn held at the back
Row B: P9, slip the last 3 sts pw with yarn held at the front
Repeat rows A&B 35 times for 70 rows total.
Now decrease:
Row 1: K2, SSK, K5, slip the last 3 st pw with yarn held at the back (11 sts)
Row 2: P8, slip the last 3 sts pw with yarn held at the front
Row 3: K2, SSK, K4, slip the last 3 st pw with yarn held at the back (10 sts)
Row 4: P7, slip the last 3 sts pw with yarn held at the front
Row 5: K2, SSK, K3, slip the last 3 st pw with yarn held at the back (9 sts)
Row 6: P6, slip the last 3 sts pw with yarn held at the front
Row 7: K2, SSK, K2, slip the last 3 st pw with yarn held at the back (8 sts)
Row 8: P5, slip the last 3 sts pw with yarn held at the front
Row 9: K2, SSK, K1, slip the last 3 st pw with yarn held at the back (7 sts)
Row 10: P4, slip the last 3 sts pw with yarn held at the front
Row 11: K2, SSK, slip the last 3 st pw with yarn held at the back (6 sts)
Row 12: P3, slip the last 3 sts pw with yarn held at the front
Row 13: K2, SSK, slip the last 2 st pw with yarn held at the back (5 sts)
Row 14: cast off pw
Weave in all ends
Instructions
The video tutorial (search Bow Brooch Material Grrrlz on YouTube) shows how to fold the bow into shape, sew it together on the backside, and use a piece of yarn to tie it together or tie a second bow on top.
Tag @materialgrrrlz in your creations !!

This pattern was originally published in the Q1 2025 issue of Material Grrrlz
Download the whole issue for free here!
(featuring even more free patterns and girly fiber art activities…)